HOW TO CONNECT TWO ROUTERS
Adding a second router will extend your wifi range and increase the number of wireless devices your home network can handle. It will also reduce the overhead on your primary router. This guide will show you how to set up and connect two routers with a choice of three different topologies:
- A wired connection between two routers on the same network (access point)
- Wireless connection between two routers on the same network (repeater mode)
- connecting a second router on a separate network
Connecting a second router to the same network will expand our existing wireless network and improve coverage. You will also be able to share resources between devices. You can connect the two routers using a wired or a wireless connection.

Access point – wired LAN to LAN connection.

Repeater – wireless connection between the routers
Connecting a second router on a separate network (LAN to WAN) will allow you to create boundaries and separate groups of devices, for example, separate the wired network from the WIFI network or separate your cameras, TVs and children’s devices from your main computer network.

Connecting two routers on the same network
The most common reason to connect a secondary router is to increase our WIFI range. Setting both routers with the same SSID will allow your devices to connect automatically to the router with the strongest signal.
You can choose to connect your secondary router in a wired connection or a wireless connection. In this guide, We will show you how to set up the connection using both methods.
You will need to decide which router will act as the primary router. We will usually use the more advanced router as the primary router. In most cases, the primary router should connect to the Internet service provider.
Set up a wired connection between two routers on the same network (access point)
A wired connection between routers is faster and more stable than a wireless connection. The main disadvantage of a wired connection is the physical work of running a cable through the house. Wired connection is suitable up to a distance of 100 meters.
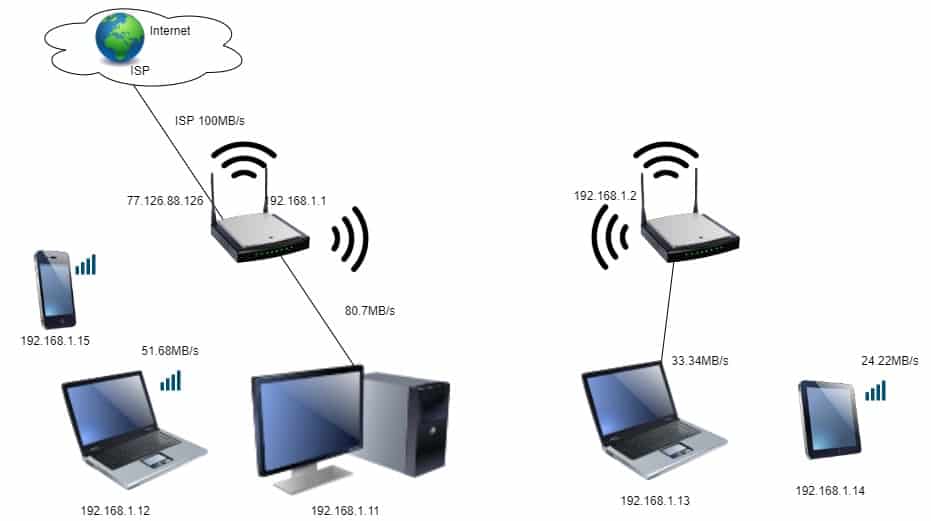
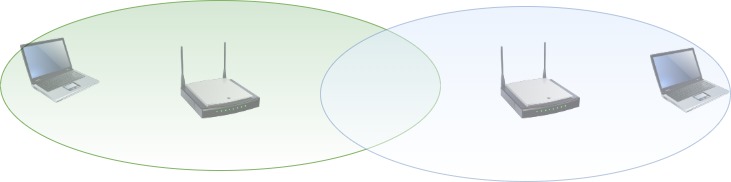
We will use the following topology to demonstrate the network infrastructure. I am using a Netgear router as the primary router and a TP-link as a secondary router.
Setting up the primary router
The primary router is the router connected to the internet and is most likely already in use. There is no need to change any settings in the primary router, but we will need access to it to get some settings:
- Router IP address
- DHCP range
- WIFI channel and security settings
We will not connect the secondary router to the network at this stage to avoid network IP conflicts.
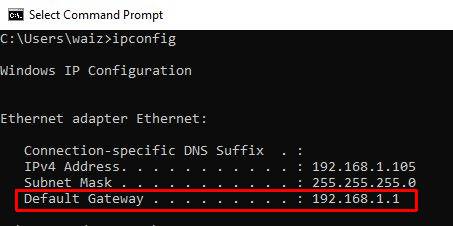
To access the primary router, type the router’s IP address at the address field in your browser and enter your username and password. If you don’t have the address, open the command prompt by typing cmd in the search window and pressing Enter. Type ipconfig and press Enter to run the command.


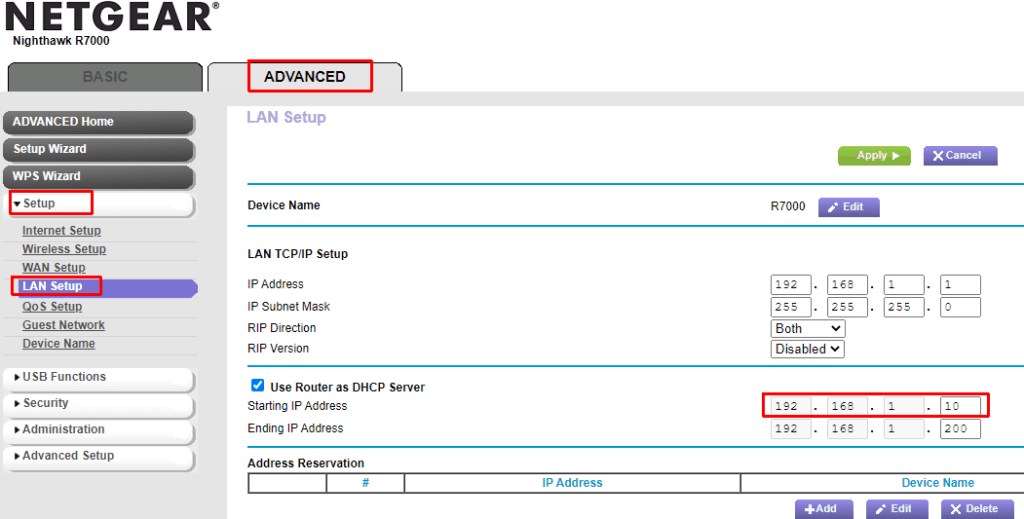
Check DHCP range:
Navigate to the LAN settings and note the router DHCP range.
The secondary router address needs to be different from the primary router address and outside the DHCP range. It is good practice to exclude the first ten addresses from the DHCP range to use them for static addresses such as routers, printers, IP cameras, etc.
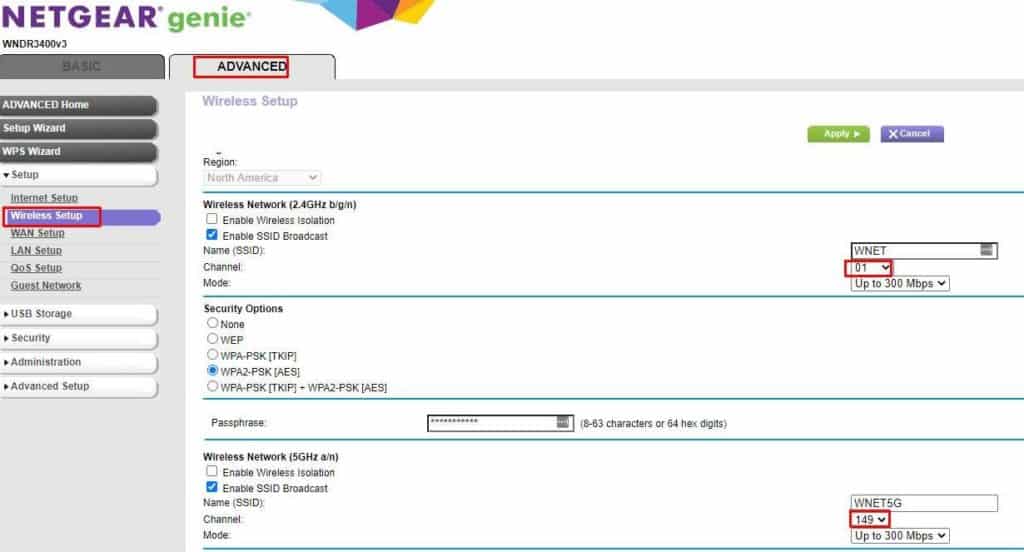
Check WIFI settings
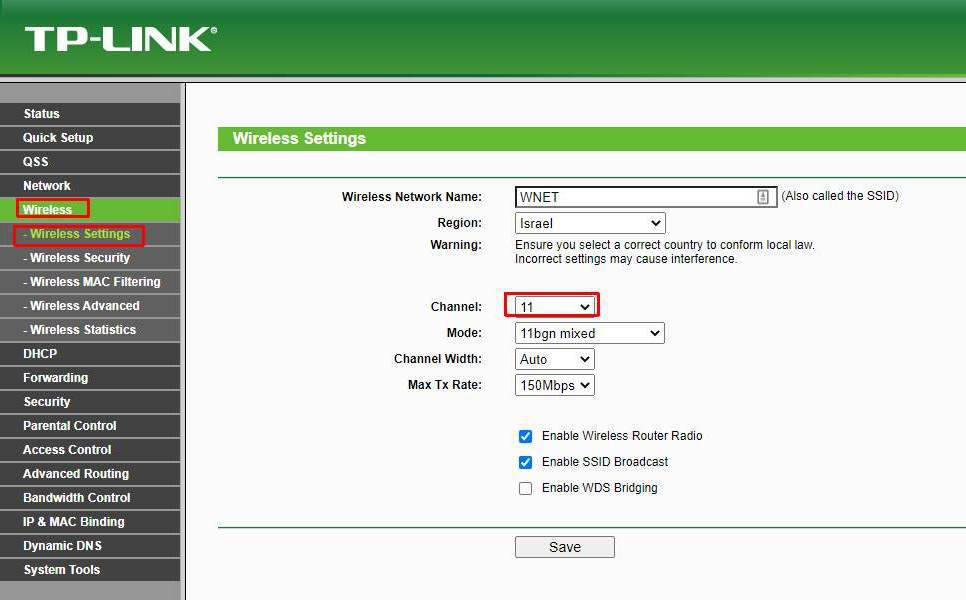
Navigate to the WIFI settings and note the channels for the 5Ghz and 2.4GHz bands. The secondary router channels will need to be different from the primary router channels to avoid interference—for example, on 2.4Ghz, Channel 1 on the primary router, and channel 11 on the secondary router.
2.4Ghz
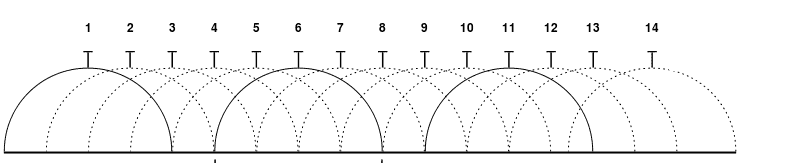
Repeat for the 5Ghz band and choose channel 149 for the primary router and 153 for the secondary router.
5GHz

Setting up the Secondary router
Before connecting the secondary router to the primary router, you will need to apply the following configurations:
- Set up a different IP address on the same subnet mask as the primary router.
- Disable the DHCP service
- Change the WIFI channels to channels that will not interfere with the primary router.
- Configure SSID, encryption method, and password. The Configurations don’t have to be the same as the primary router but setting up the same configuration will enable roaming.
Configuration details (with examples):
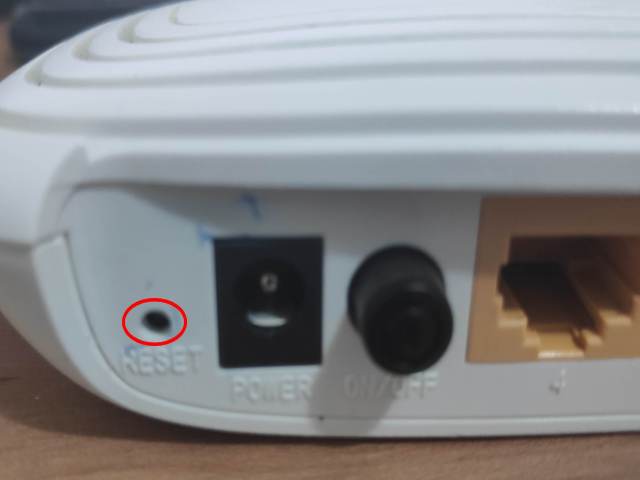
Reset the secondary router to factory defaults.
If you are setting up a used router, it is good practice to reset it to the factory defaults. Resetting the router will delete its current settings and reset the password to the vendor default password. You will be able to find the password on the vendor’s website, the manual, or written on a sticker at the back of the router.
Common default usernames and passwords are admin, password or admin, admin.
To reset the router, switch it off, use a pin or a paperclip to hold down the reset button, switch on the router while holding down the reset switch, wait for 15 to 30 seconds, and release.
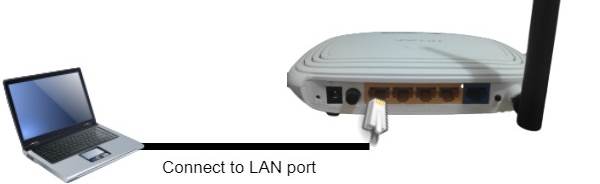
Connect the secondary router to a computer using an ethernet cable. Both the secondary router and the computer need to be disconnected from the primary router to prevent a possible conflict.
Access the management console, typing the router’s IP address at the address field in your browser, and enter the username and password. To find the router’s IP address open the command prompt by typing cmd in the search window and pressing Enter. Type ipconfig and press Enter to run the command. You will see the router’s address next to the default gateway field.


Change Secondary router IP address.
Access the secondary router LAN settings and change the IP address to a different address on the same subnet mask as the primary router and outside its DHCP range.
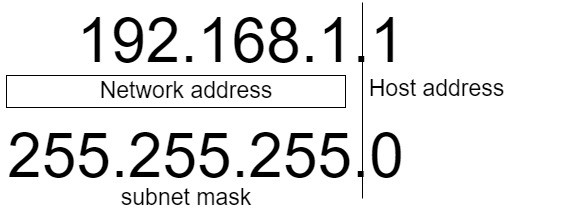
In our example, the primary router has an IP address of 192.168.1.1 and a subnet mask of 255.255.255.0, and the DHCP range is 192.168.10.10-192.168.10.200, so we can configure the address 192.168.1.2 on the second router.
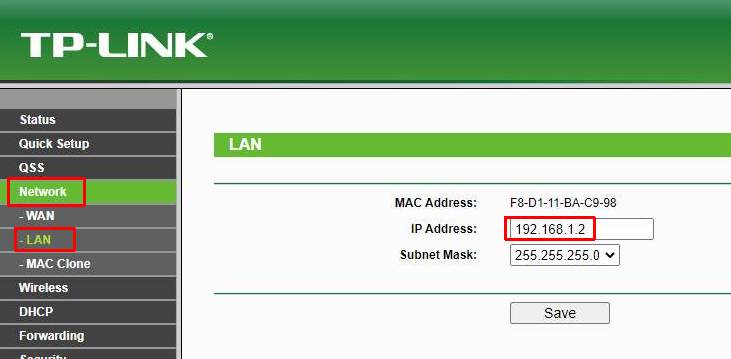
After you change and save the router IP address, you will need to log on with the new IP address (192.168.1.2).
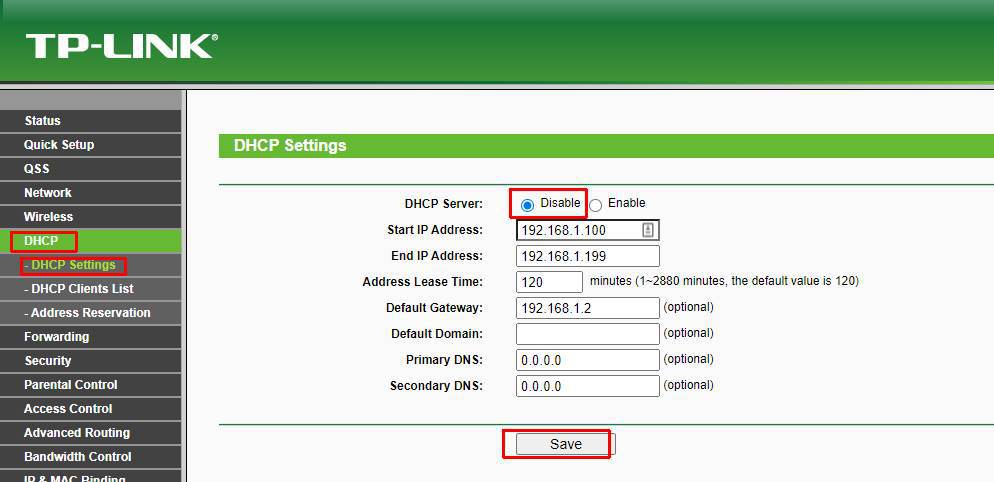
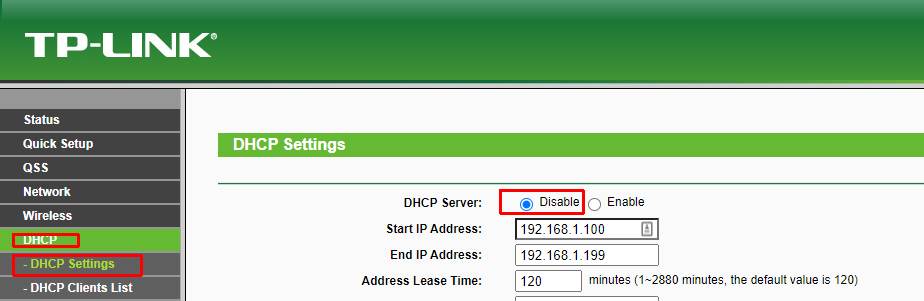
Disable DHCP on the second router
Your primary router is already set up as DHCP, so you can disable the DHCP service on the secondary router.
Wifi Settings
Change the wireless channel of the secondary router so that the signals do not interfere with each other. In our example, We will configure channel 11 on the 2.4Ghz frequency (and channel 153 on the 5Ghz frequency).
In the wireless security settings, configure the encryption to WPA2-personal [AES] with a strong password.
Roaming (optional)
You can allow WIFI roaming by configuring the same SSID, encryption version, and password on both the primary and secondary routers. Roaming will allow you to automatically connect to the router with the stronger signal when you move out of range of one of the routers.

After configuring the above network and wifi settings, save the changes and reboot the router. Disconnect the secondary router from the computer.
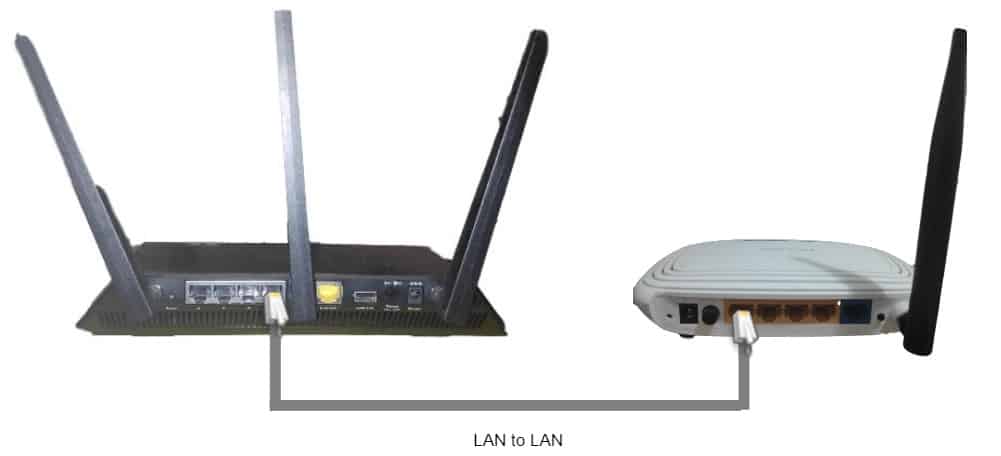
Connect the two routers.
Connect a cable from a LAN port from your Primary Router to a LAN port on your secondary router. (any LAN ports may be used, but do not use the WAN port).
Placing the router
The configuration is complete. You will now need to run a CAT6 ethernet cable through the house between the two routers. The easiest (but not the prettiest) way is to run the cable on the wall and around the doors using cable clips or wire ducts. Another option is to utilize the electric wall sockets and use powerline network adapters. Otherwise, a more challenging approach is to run the cable through the wall and existing infrastructure. The maximum distance for the cable is 100 meters.

Set up a wireless connection between two routers on the same network (repeater bridge)
Setting up a wireless connection between two routers can be convenient because it will save you from all the wiring hassles. However, the downside is that it has to talk in two directions, meaning you could see up to 50% loss of performance and speed on the secondary router.
The following topology represents the network infrastructure. I am using a Netgear router as the primary router and a TP-link as a secondary router.
Setting up the primary router
The primary router is the router connected to the internet. There is no need to change any settings in the primary router, but we will need access to it to note the following configurations:
- Router IP address
- DHCP range
- WIFI, SSID name, channels, and security settings
- You might need The Basic Service Set Identifier of the wireless access point (BSSID), but we will touch on that later.
Note the router DHCP range and make sure the first few addresses are free.

Navigate to the WIFI settings and note the channels for the 5Ghz and 2.4GHz bands. If the channels are configured to “automatic,” change the channel manually to 1 for the 2.4Ghz channel and 149 for the 5Ghz channel.

Note the security settings

Setting up the secondary router
If you are setting up a used router, it is good practice to reset it to the factory defaults.
You will need to apply the following configurations on the second router:
- Configure a different IP address on the same subnet mask as the primary router.
- Link the wireless connection (wireless bridge) between the secondary and the primary router using the WDS bridging feature. The encryption method, channel, and password need to be the same as the primary router.
- Change the WIFI channels to channels that will not interfere with the primary router.
- Configure SSID, encryption method, and password. The Configurations don’t have to be the same as the primary router but setting up the same configuration will enable roaming.
- Disable the DHCP service
Configuration Details (with examples):
Reset the secondary router to factory defaults.

Change Secondary router IP address.
Connect the secondary router to a computer using an Ethernet cable and access the management console.


Access the secondary router LAN settings and change the IP address to a different address on the same subnet mask as the primary router and outside its DHCP range. For example 192.168.1.2

After you change and save the router IP address, you will need to log on with the new IP address (192.168.1.2).
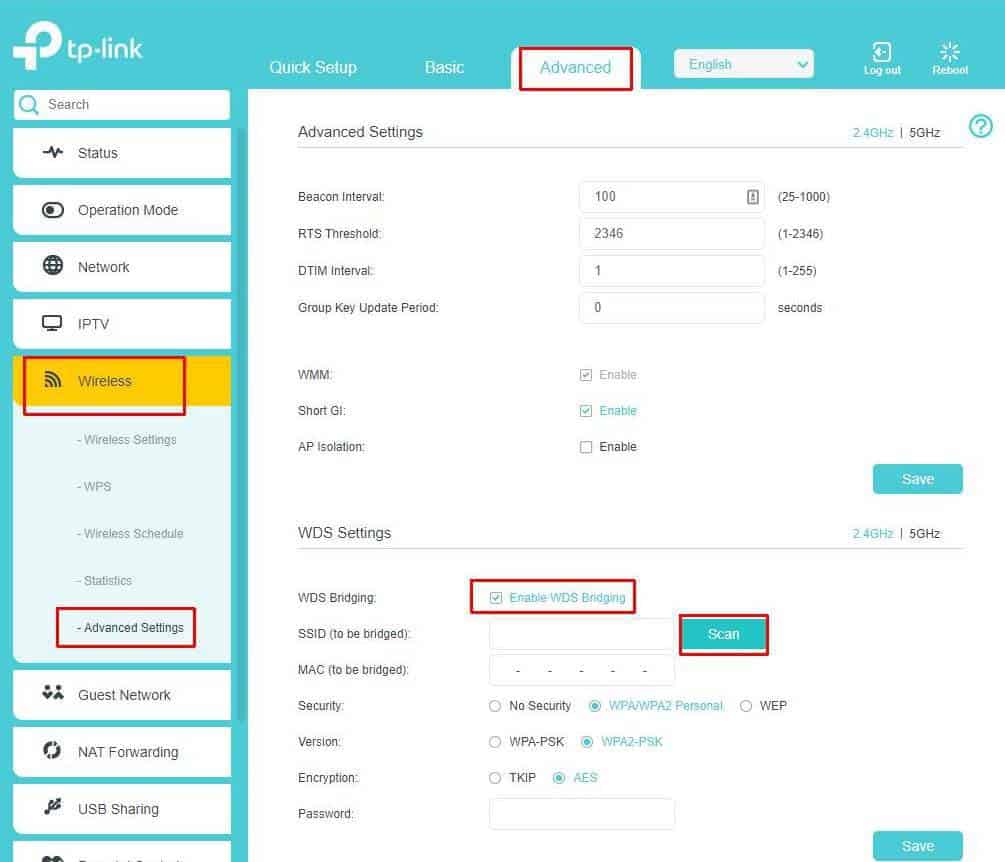
enable bridging between the primary router and the secondary router
Enable bridging connection between the secondary and the primary router using the WDS feature.
Access wireless settings and enable WDS
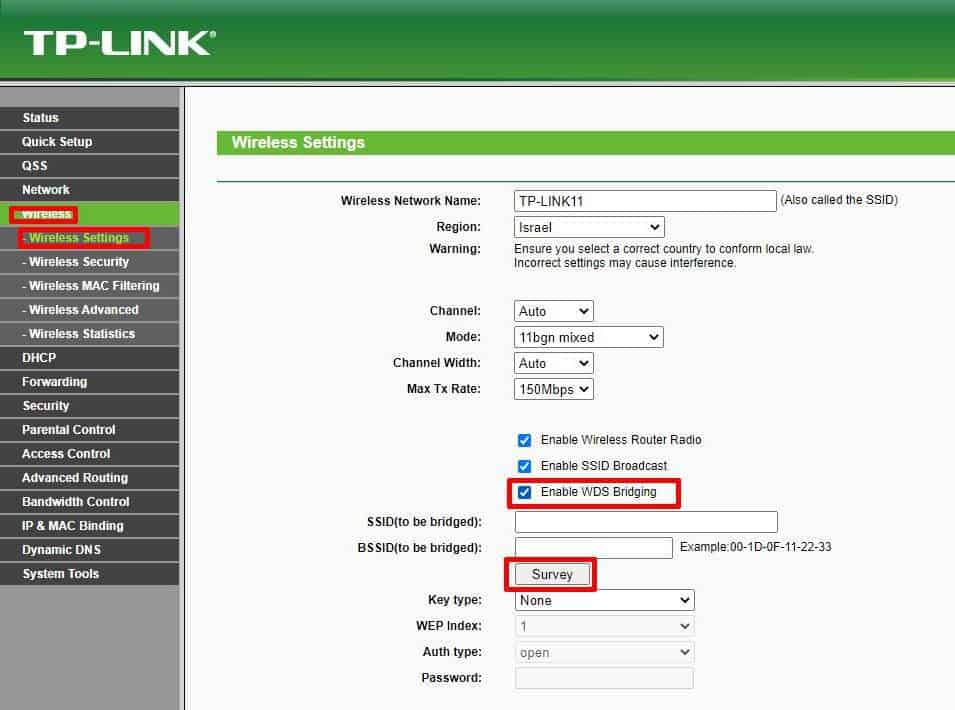
Perform a scan (or survey) and select the SSID name of the primary router. This feature will automatically Fill in the BSSID of the primary bridge.
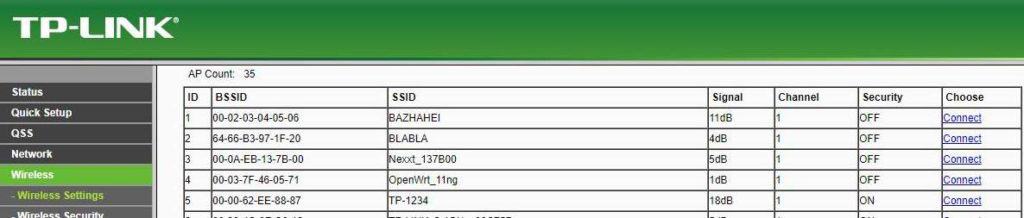
The configuration might be different on your router, this is an example for a different model:
In our example, the secondary router will perform a scan and automatically identify the primary router BSSID address. If your router does not support automatic scan, you can locate the BSSID address in the following way:
- Use a computer with a wireless connection to connect to the primary router
- open the command prompt and enter the following command:
netsh wlan show interface
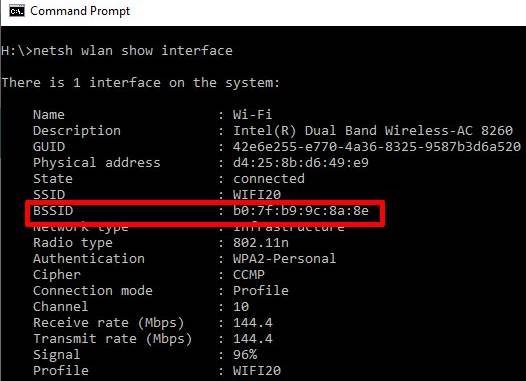
- repeat the process for 2.4Ghz and 5Ghz channels
- Manually enter the BSSID address on the secondary router
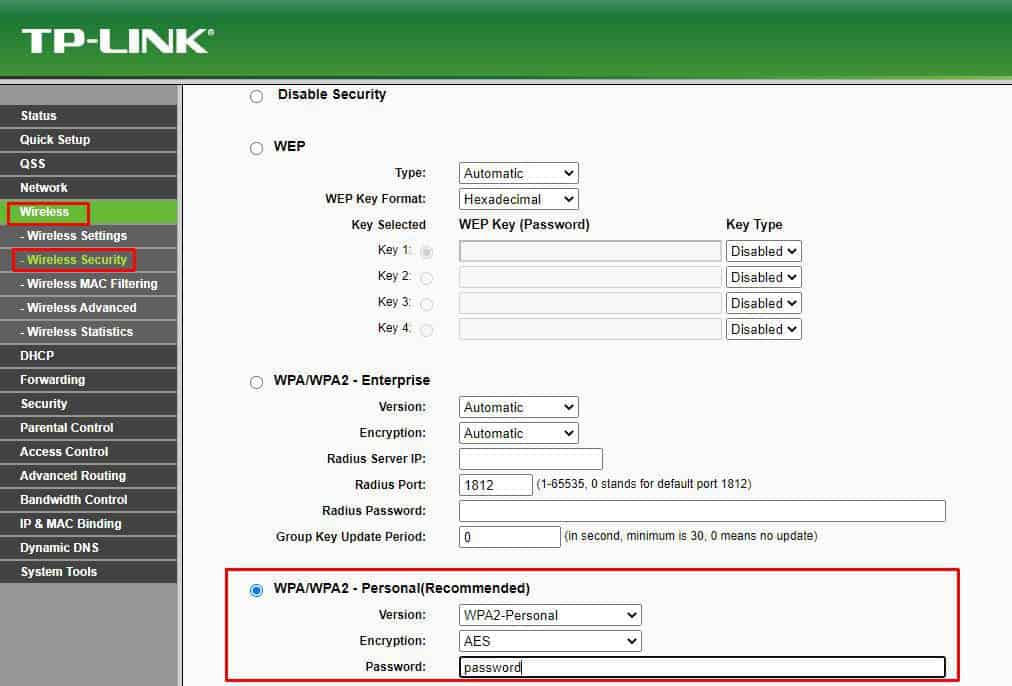
Enter the SSID, encryption method, channel, and password. All the configurations need to be similar to the ones on the primary router, including the channel.

WIFI settings
The previous configurations enabled bridging between the primary router and the secondary router but did not secure the secondary router. You will now need to configure the SSID, encryption method, and password for the secondary router. Those configurations don’t have to be similar to the primary router, but entering similar configurations will enable roaming.
Save all the settings, reboot the router and disconnect the ethernet cable.
Access the management console. Disable DHCP on the secondary router and save all the settings again.
Placing the secondary router
The ideal location to place the secondary router is halfway between your primary router and your computer, within its wireless range.
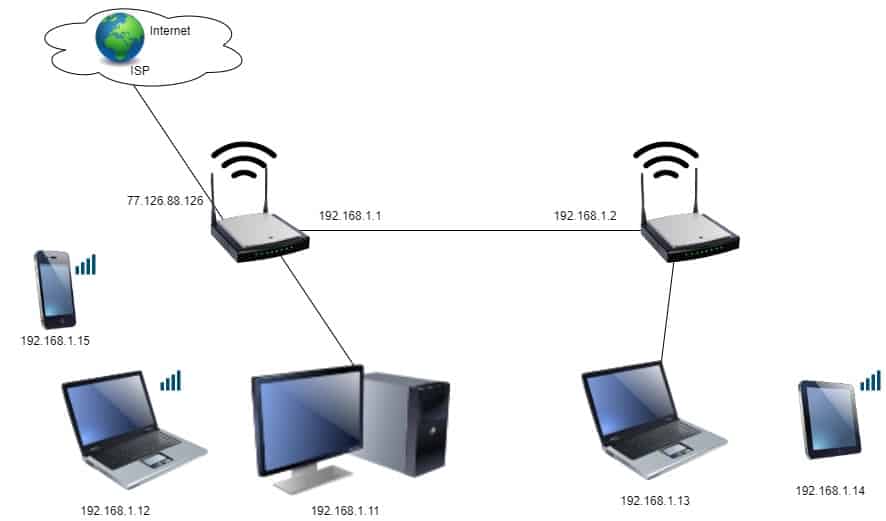
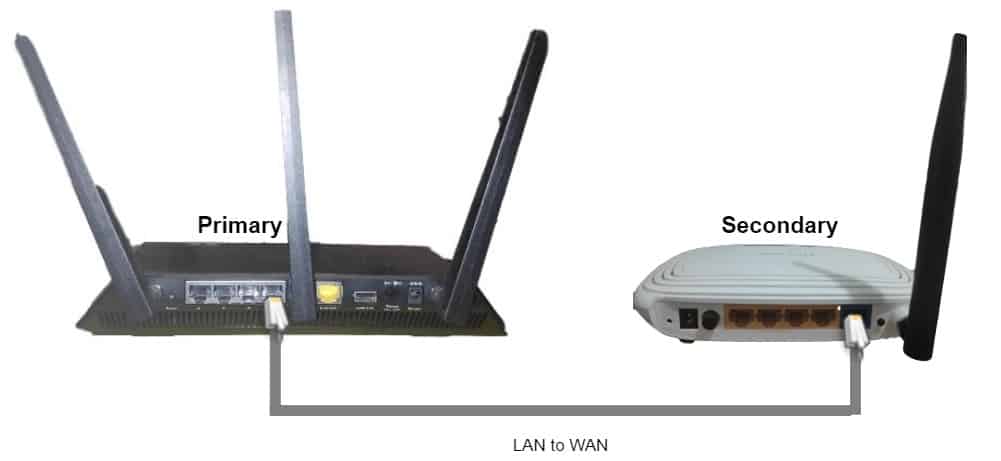
Connecting two routers on separate networks
Separating your network at home can have several advantages and allows you to have more control and security over your network:
security: Create virtual boundaries by separating your WIFI network from your wired network or separate insecure devices such as cameras, smart TVs, appliances, or even the children’s devices from your main computer network.
Performance: Separating a busy network can relieve congestion and decrease broadcast traffic.
The following topology represents the network infrastructure. I am using a Linksys router as the primary router and a TP-link as a secondary router.

Setting up the primary router
The primary router is the router connected to the internet. There is no need to change any settings in the primary router, but we will need access to it to note the following configurations:
- Router IP address
- WIFI channels
To access the primary router, type the router’s IP address at the address field in your browser and enter your username and password. If you don’t have the address, open the command prompt by typing cmd in the search window and pressing Enter. Type ipconfig and press Enter to run the command.
Make a note of the WIFI channels.
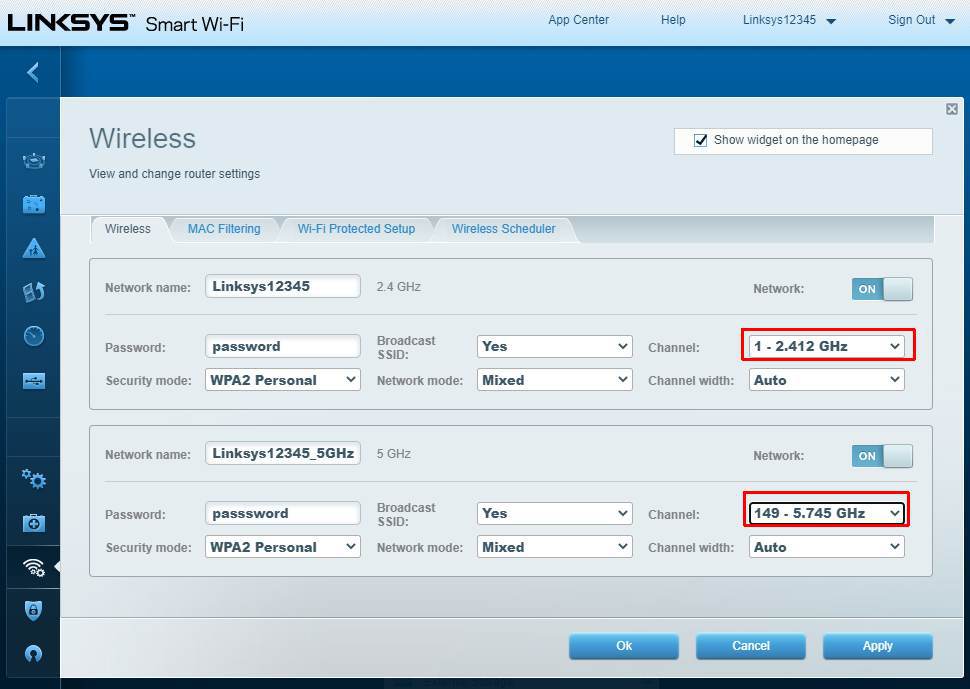
If the channels are set to “automatic,” change the channel manually to 1 for the 2.4Ghz channel and 149 for the 5Ghz channel.
Setting up the secondary router
You will need to apply the following configurations on the second router:
- Set up a static LAN IP address on a different network as the primary router.
- Setup a static WAN address on the same network as the primary router
- Change the WIFI channels to channels that will not interfere with the primary router.
It is good practice to reset it to the factory defaults.
Connect the secondary router to a computer using an ethernet cable and then Access the management console, typing the router’s IP address at the address field in your browser.
LAN settings
In the network LAN settings, change the IP address to an IP that is on a different network than the primary router
In our example, the primary router has an IP address of 192.168.1.1 and a network of 192.168.1.0, so we will choose the 192.168.2.0 network and configure the address 192.168.2.1 on the second router.
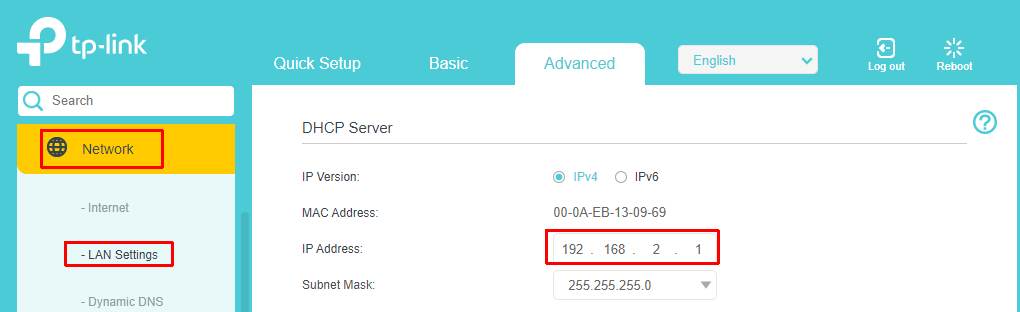
After you change and save the router IP address, you will need to log on with the new IP address (192.168.2.1).
WAN settings
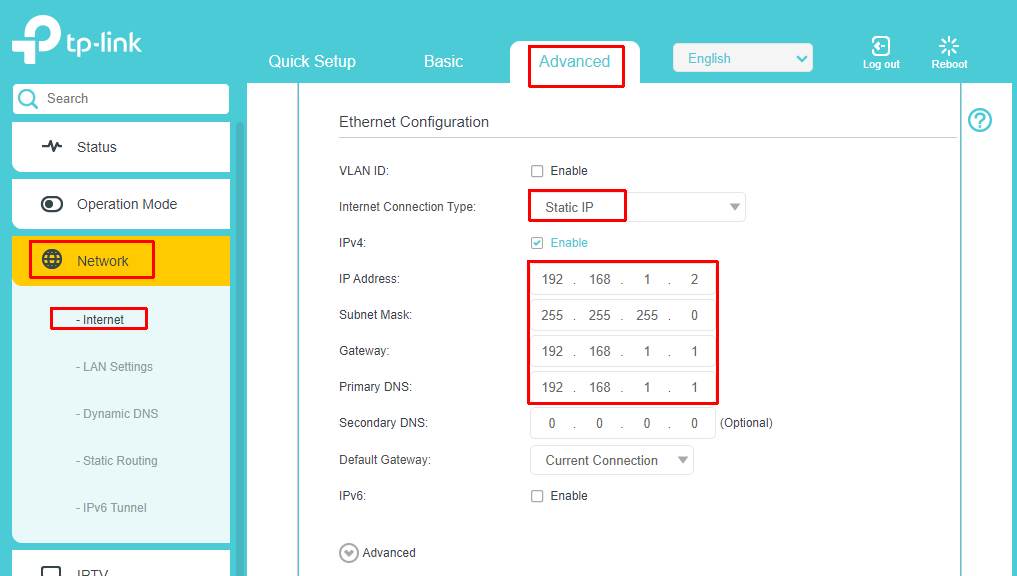
In the network WAN (or internet settings depending on the router), change the IP address to an IP on the same network as the primary router.
This setting will enable the connection between the primary and the secondary router.
In our example, the primary router has an IP address of 192.168.1.1 and a network of 192.168.1.0, so we will configure the address 192.168.1.2 on the second router staying on the same network.
The secondary router will connect to the internet through the primary router. Therefore, we will enter the primary router’s IP address as the default gateway and primary DNS (192.168.1.1)
Save the settings.
WIFI settings
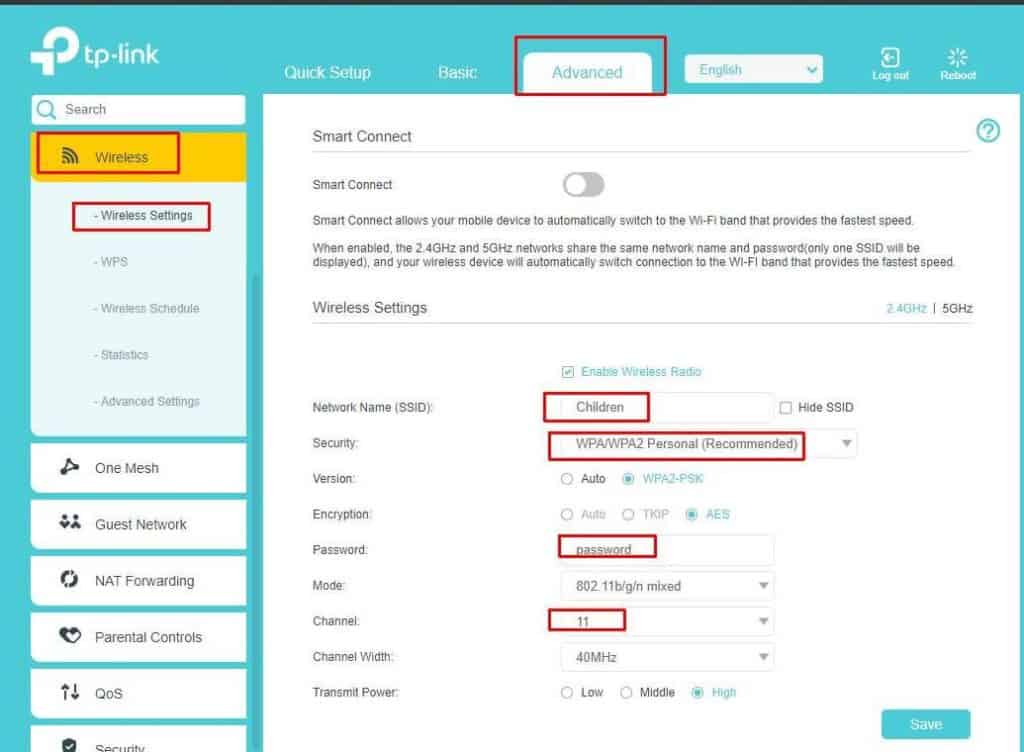
Change the wireless channel of the secondary router so that the signals do not interfere with each other. In our example, We will configure channel 11 on the 2.4Ghz frequency (and channel 153 on the 5Ghz frequency).
Save the settings and restart the router.
Connect the two routers.
Disconnect the cable from the PC and connect the cable from a LAN port from your Primary Router to a WAN port on your secondary router. (any LAN ports may be used on the secondary router, but do not use the WAN port).
Placing the router
The configuration is complete. You will now need to run a CAT6 ethernet cable through the house between the two routers. The easiest (but not the prettiest) way is to run the cable on the wall and around the doors using cable clips or wire ducts. Another option is to utilize the electric wall sockets and use powerline network adapters. Otherwise, a more challenging approach is to run the cable through the wall and existing infrastructure. The maximum distance for the cable is 100 meters.
Consider disabling WIFI on one of the routers and adding a firewall to the topology for better security.